What is a custom 404 Error page? Have you ever clicked on a link when searching for something on a search engine page (such as Google or Yahoo) and you get a 404 Error, which is not what you had expected? This usually means that the web page that you were trying to access either no longer exists or has moved. Wouldn't it be nice to be able to give your website-user some tools to be able to navigate back into your website in case they were to try to access a page that does not exist? By creating a custom 404 Error page, you can do just that!
Check out a listing of some really interesting and creative 404 error pages that other people have created: http://www.bspcn.com/2007/09/13/collection-of-awesome-404-pages/
Here in Colorado, the County Extension websites are typically hosted centrally on CSU's Yuma server. Each county has an individual account (CWIS) that allows them to have an individual website. To create a custom 404 Error page, you will need to create a simple .htaccess text file and a 404.html file, which will contain your custom error. This process is very quick and easy. First, open up Notepad (or some other similar simple text editing tool). On a Windows PC, Notepad may be found by clicking on Start > All Programs > Accessories > Notepad. Now, create a simple text file that contains the following line of code:
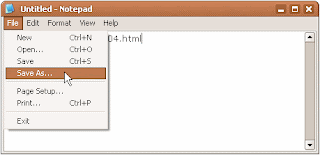
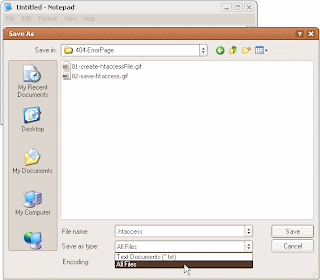
ErrorDocument 404 /404.htmlNext, you are going to want to save the file (File > Save As) on your hard drive, preferably in the root directory of wherever you save your website files. Name the file ".htaccess" (without the quotes). Here's the important part: when you save the file, make sure to selct the drop-down menu for "Save as type" and select "All Files"; otherwise, Windows will add the ".txt" file extension to your file name, which you do NOT want. This file should be called ".htaccess", not ".htaccess.txt", and yes, you do want to have a '.' (period) preceding the file name.


You're now finished with creating the .htaccess file and you can close Notepad. Using Dreamweaver (or your favorite Web authoring tool), create your custom 404.html error page. This page will reside in the root directory of your CWIS account when you are finished, so keep that in mind if you have images or a navigational structure that is coded into your page. It's generally a good idea to state something to the effect of "This page has been moved or it no longer exists" and give the user a method for navigating back into your website; it's also a good idea to include a page title that reads, "404 Error - Page Not Found". To see a live example of a custom 404 error page that resides on the Yuma server, look here: http://ap.colostate.edu/asdfjkl Once you have created the file, save it and name the file "404.html" (without the quotes).
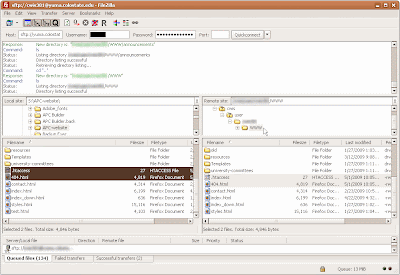
Now you are ready to upload your .htaccess and 404.html pages up to your CWIS account. Both of these files will need to reside in the root directory of your website (WWW folder). Use either Dreamweaver's FTP uploading functionality, or use an FTP client such as Filezilla, as pictured below.
 To test out your new custom 404 Error page, go to your website and type in some gibberish after your URL (www.yourwebsite.com/asdflaksdf); you should see your custom error page.
0 comments:
Post a Comment