The New Prezi

on Thursday, November 21, 2013

Prezi is a free, browser-based, online presentation tool that allows you to build presentations that are a refreshing change from the tired familiarity of PowerPoint.  It allows you to break away from the march-step of bullet points that PowerPoint forces you into, and offers a non-linear and visually exciting way to present information.

The interface has changed rather drastically since last year. The zebra and bubble tool are gone (I personally loved working with the zebra), and replaced with more traditional menu choices at the top of the screen (upper left), as well as clearly labeled editing options when an object is selected (lower left).

The result is still the same, and old Prezis can be edited with the new tools.  It is still a excellent alternative to  PowerPoint.   Below I've embedded a presentation that gives you an idea of what a Prezi presentation looks like, as well as some tips on how to create an effective presentation (best viewed full-screen, use your left and right arrow keys to navigate).

There will be a Connect session on how to work with the new Prezi interface early next year.


Free Photoshop Express App

on Friday, November 8, 2013

The desktop version of Photoshop is a pretty pricey program, so it is surprising that the Photoshop Express app is free (there is a $9.99 version as well, Photoshop Touch, which is more robust).  Admittedly, the online message boards are alight with dissatisfied users who preferred the previous version of Photoshop Express, but personally I found it easy and fun to use, with an intuitive interface and useful, if limited, set of tools. It is available for both Apple and Android devices, and both tablet and phone.

There are more tools available on the tablet version (screenshot at right) than there are the phone version (screenshot at left).  Both allow you to do basic cropping/rotating/straightening and color correction.  Both have a variety of special effects and borders from which to choose.  Available (and free!) at the iTunes Store and Google Play.


Quickoffice App is Free!

on Monday, October 21, 2013

If, like me, you've already paid $19.99 for Quickoffice Pro, you might not be too happy to hear this, but now Google is offering Quickoffice for free.  You need to have a Google account to use it, and since it works in concert with Google Drive (formerly Google Docs), you will need that free app as well. You can get it in the iTunes store or at Google Play.

Quickoffice allows you to view, edit and create Microsoft Office documents created in Word, Powerpoint and Excel on your tablet or phone.   It is designed to work seamlessly with Google Drive, automatically saving and retrieving documents from there.  Unlike the old paid version, you cannot easily retrieve documents from other cloud services, such as Dropbox.  This is the only real drawback to the new version.

The good news: the new version makes it much easier to create documents from scratch, which was an annoying problem in the old version (my personal opinion).  The old version is not fully compatible with iOS7 (the latest Apple OS), and will not be supported after March, 2014.

For the next two years, Google is giving you 10gb of storage for free, as an incentive to using it.  And it's free!  So, if you are a current user of Quickoffice Pro, or looking for an app to create and view MS Office documents on, I'd recommend Quickoffice. 

Evernote Clearly

on Thursday, September 26, 2013

Evernote Clearly (http://evernote.com/clearly/) is an add-in for Chrome, Firefox and Opera that allows you to strip away the menus, ads and other extraneous content and only keep text and pictures.  The goal is to allow you to send a stripped down version of the page to Evernote for storage (I have a previously posted about Evernote, an app I become more enthusiastic about as I add content to it).

And while that alone makes Clearly a very useful tool, what makes it even more useful is that you don't even need to use it in the context of Evernote, but can simply use it to strip away all the distractions and advertisements and only focus on content.

Here's a random example.  Before...


And after...
 To launch Clearly, click the lamp icon (see screenshot at left) in the upper right of your browser (the elephant icon is used to send the webpage directly to Evernote).  In addition to the icon, there is a slide out menu (see screenshot at right) that allows you to highlight, print, change text size, and send to Evernote. Clearly is an excellent companion to an already remarkably useful tool.


Tabs for Microsoft Office

on Friday, August 23, 2013

If you use tabbed browsing while working online to shift quickly between webpages, it can be frustrating to work in Microsoft Office products and have to open one document at a time, and use the taskbar or Alt+Tab to move between documents.


ExtendOffice (http://www.extendoffice.com/download/office-tab.html) is a free add-in for Microsoft Office that adds tab functions to Word, PowerPoint and Excel (the paid version also adds them to Publisher, Access and Visio).  This allows you to move quickly between documents, particularly useful if you are comparing documents or copy-and-pasting sections of content from one document to the other.  The screenshot at the upper right shows the tabs of two presentations pulled up in PowerPoint 2010, so the two presentations can be accessed more quickly, simply by clicking the tab.

The tabs are very customizable, and different settings can be used for different Microsoft programs (tab options for Word are shown at left).  It is compatible with Office 2003, 2007, 2010, and 2013.

Connect Schedule, Fall 2013

on Monday, August 12, 2013

A new series of Connect sessions begins in September.  The two topics we'll be focusing on are Basic Dreamweaver Skills and the iPad App of the Month!  Dreamweaver sessions will be the first Wednesday of every month, iPad sessions will be on the third Wednesday of every month. All sessions will be from 9-10 a.m. and last about an hour. Instructions for participating in the sessions will be emailed out at the beginning of the week each session takes place.
  • Sept 4 – Defining and downloading sites, adding basic content in Dreamweaver
  • Sept 18 – Presentations Using iPad
  • Oct 2 – Optimizing images for the web
  • Oct 16 – Evernote for iPad
  • Nov 6 – Online Polling and Survey options for your website
  • Nov 20 – Office apps for iPad
  • Dec 4 – Using named anchors on your site
  • Dec 18 – iFilmaker and Action Movie for iPad
Any questions?  Email me at jeffrey.wood@colostate.edu


Evernote

on Monday, July 22, 2013

Evernote (https://evernote.com/) is a well designed and useful repository for notes, pictures, video, audio, documents, webpages, and clips from webpages.  You can install it onto all of your devices (desktops, laptops, tablets, phones) and it will automatically sync your devices so they all share the same information (this can also be done manually).  There are add-ons for Outlook and most browsers as well, so you can quickly send emails and websites to your Evernote account. And it's free!

You can, for example, add to your shopping list from your desktop throughout the week, and when shopping day comes along you just take your phone with you, and your up-to-date list will be in Evernote.  The folks at Evernote suggest that you start with one project (a shopping list is a great place to start) until you get a sense of how it works, then branch out onto other projects.


Its versatility becomes more apparent the more you use it.  You don't need to be in Evernote to add  notes.  Outlook allows you to forward an email simply by clicking an icon (screenshot at left). Browsers with the Evernote add-on have a similar icon so you can send an entire webpage as a note, or if you have selected a portion of the page, it will clip only that section (screenshot at right).

It also works well as a place to store documents. You can email documents, pictures, audio and video to your account.  If you have your notes divided into folders, put @name-of-folder in the subject line of the email, and it will go to that folder.  Similarly, if you put #name-of-tag in the subject line, it will automatically tag the note for you.

Evernote accounts can be shared with colleagues, so you can set up accounts for specific projects.  While you are limited to 60 mb of data a month, storage is unlimited.      

There is much more to this versatile tool.  Give it a try at https://evernote.com/.  We will delve into the specifics of its use in a Connect session this Fall.
  

IFTTT (IF This, Then That)

on Monday, July 8, 2013

IFTTT is a free on-line tool that triggers an on-line action when a specific event happens.  It sounds  simple, but potential uses for it are limitless.  It is easy to customize and use, and many examples are available to browse.  Find it at https://ifttt.com/.

Examples: Have an email sent to you when someone tags you on Facebook.  Have a text message sent to you on any day it is supposed to rain.  Email travel receipts to Evernote.  Get an email whenever the Mets win.

You choose the trigger (the event) and the event (what happens when the trigger is activated).   Let's go back to that example where you get emailed when it's going to rain.


The trigger (this) in this example is a specific weather condition (you could also, for example, get a text when the weather goes below freezing). 


 The action (that) is getting a customized email telling you it's going to rain (you could also, for example, have it send you a text or a post to Evernote).

It's very simple, but infinitely customizable, and you can create complex chains of triggers and events.  There are many "recipes" on the site, so you can browse until you find one that is close to fitting your needs, and then tweak it until it does exactly what you want it to.

This is a fun and powerful tool.  Give it a try! 

Three Ways to Reduce PDF File Size

on Thursday, May 9, 2013

Most of you who have access to your county's Extension website frequently post Adobe PDFs on the site, as it is seen as a universal format, since it does not requite the end-user to buy anything, but merely download the Adobe Reader.

Just like images, it is a good idea to compress the size of your PDF document as much as possible, to save valuable file space on the web server.  Here are three ways to do so.

Save as a Reduced Size PDF. In Adobe Acrobat, choose File, then Save As, then Reduced Size PDF.  A screenshot is below, taken from Adobe Acrobat Pro X.  You'll then get a dialogue box asking for Acrobat version compatibility.  As it states in the dialogue box, the later version of Acrobat you choose, the lower the file size.


 Optimize the document.  In Adobe Acrobat, choose File, then Save As, then Optimized PDF.  Set Compression quality to Low (see screenshot below) for both Color and Grayscale Images.  For more control, you have a panel on the left to control which objects to compress (Images, Fonts, etc.).


Housecleaning.  Realize that when you delete a PDF file (or any other file) in your local copy of your website, that file is NOT deleted on the website itself.  So, perhaps twice a year, go into the site (in Dreamweaver's FTP use the Remote Panel, typically on the left) and delete any old PDFs (and any other files) that you no longer link to or use.  You will be surprised at the unused documents that can accumulate over the months.


Selecting Recently Modified Files in Dreamweaver

on Thursday, April 11, 2013

This command is a real time-saver.  Let's say you've been working on your website for the past two days and you are finally ready to upload your changes to the server, but you've worked on so many pages you don't want to go through the entire site and pick the ones to upload.  You can have Dreamweaver do it for you.

First, expand the File pane using the Expand icon, shown at left (you should always expand the File pane before uploading to the server.).

Next, go to the Edit menu and choose Select Recently Modified.  The dialogue box gives you three useful options, shown below.  You can select any files you've created or modified in a specified number of days (the screenshot shows 2 days).  You can select files you've worked on in a specific date range.  Or, if you are using the Contribute option, you can select files worked on by a specific person.

Caveat!  Dreamweaver often will NOT select images or documents you've added recently, even if you are linking to them from your recently modified page.  You need to do that manually.  And ALWAYS check your links after you've published.


11 Google Products You Never Knew Existed

on Wednesday, April 3, 2013

Business Insider recently ran an article entitled "11 Google Products You Never Knew Existed."  As might be expected, some of these are fun, some are fairly useless, and some appear to be useful, well-designed on-line tools.

The most interesting of the 11:


The entire article can be found here.

Adding Captioned Photos to a Webpage

on Thursday, March 14, 2013

You can use a table to place a photo and accompanying caption to a web page.  Start by clicking the Table icon in the Insert panel (screenshot at left).

Use the dialogue box (screenshot below) to create a table consisting of 2 rows, 1 column. Select the table width; the example is set at 50 percent of the containing element. Set border, padding and spacing in pixels.  Click OK.


Click inside the top cell of the table.  Click the Image icon in the Insert panel.  Select the image you'd like to insert, click Okay, and give it Alt text (a succinct description of the image).  Click inside the bottom cell.  Type in your text.  Give it a style from the format box screenshot below); Headings 4, 5 and 6 are generally best suited for captions.  


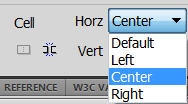
If you'd like to align the content (i.e. - the image or the text) of either individual cell, click inside the cell and use the Horizontal and Vertical cell alignment tools (screenshot at left).


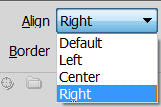
To get the accompanying text on the webpage to wrap around the table you'll need to align the table either left or right. Select the table by clicking the border.  Choose Left or Right on the Table alignment tool (screenshot at left).

Before you publish the page, make sure to preview it in at least two different browsers, as tables appear differently in different browsers.


Dreamweaver Skills Connect Sessions

on Tuesday, January 8, 2013

Have a new copy of Dreamweaver and not sure what to do with it?

For the next four months, I will hold a Connect session on Basic Dreamweaver Skills, on the first Wednesday of every month at 9 a.m.  Each session should take about 40 minutes.  If you are taking over the maintenance of a new web site, these sessions may come in handy.

The schedule:

  • February 6th: Defining the site in Dreamweaver/Using Dreamweaver's FTP
  • March 6th: Adding basic content (text, pictures, bullet points, headers, links)
  • April 3rd: Creating new pages (1, 2 and 3 column formats will be discussed) 
  • May 1st: Working with SSIs (top and left navigation panels, footer) 
Look for emails announcing each session.  If you need more information, please email me at jeffrey.wood@colostate.edu.