AVS4You (http://www.avs4you.com/) offers cheap and easy to use audio and video editing and converting tools. The home page of the site is a little misleading, as the download buttons say "Free download," but the non-activated versions have a watermark in the middle of the screen (shown below), as well as an audio watermark for audio tools. So, you're going to have to pay to get anything useful.
Still, their products are easy to use, and cheap: $39 for a one year subscription to all the tools they offer, and $59 for unlimited access to all their audio and video tools.
The screenshot below shows how simple the video conversion tool is. You select the file you wish to convert, select what format you want to convert it to using the icons at the top, choose a folder and a file name, and click "Convert Now."
The video editing tool is similarly user-friendly. You import video clips, drag them into the time line at the bottom, where you can trim them, add text, transitions, and audio tracks. A screenshot is below.

If you are making multiple changes/additions to a site in Dreamweaver, and are ready to upload them to the web server, there's a neat little time saving command hiding in the Edit menu called Select Recently Modified.
Select Recently Modified calls up the dialogue box shown below, where you can give Dreamweaver a specific time frame--we'll use the last 7 days as an example--and Dreamweaver will automatically select all the files in your local site that have been added or modified in the last 7 days. It will select not only newly modified webpages, but all recently added images and documents as well. All you need to do then is hit the "upload" button (the up arrow on the toolbar) and Dreamweaver will upload those files.
This feature is available in all versions of Dreamweaver, from Dreamweaver 3 all the way to CS4.
Labels: dreamweaver, web design
Dreamweaver makes quick work of embedding Flash videos and animation into a webpage. Because Adobe owns Flash, it has a vested interest in getting you to use it.
Go to the Media icon in the insert panel (circled in red on the illustration below), browse to the file, and that's it! You can adjust the size using either the Property Inspector height and width boxes, or by holding down shift and dragging a corner of the video, but sizing the video is best done when you first render it, and not after the fact in Dreamweaver.
Embedding Quicktime video involves a little more work, but not much. Go to the video icon (shown above, circled in red) and choose ActiveX. You'll get an ActiveX icon on the document panel. Go to the Property Inspector below the document panel. Click the "Embed" checkbox (circled in blue below). Browse to the Quicktime video using the file icon to the right of the "Source" box (circled in yellow below). You may need to change the "files of type" box to "all files" in order to see the file. Finally, give Dreamweaver the width and height of the video (circled in black below).
For demonstrations of embedding Quicktime and Flash, as well as demonstrations for embedding slideshows, cellphone videos, and Youtube videos, please come to the Connect session tomorrow, May 20th at 9 a.m. Instructions for attending should be in Monday's email (subject line - Connect session: On-line Video and Presentation Options). Or contact me for more details: jeffrey.wood@colostate.edu.
Labels: video
Error Messages for Windows is a very small and very cool utility that lets you quickly look up MS Windows error code numbers and tells you what they mean in relatively plain English. It also lets you display and print all of the error codes and messages defined for your version of MS Windows. A screenshot is below.
Error Messages for Windows runs on Windows XP, Windows 2000, Windows 98 and Windows 95.
Download Error Messages for Windows here.
Labels: windows
There are lots of cool "add-on's" for Firefox, which allow you to customize your browser to best fit your own personal habits. You can add instant Babelfish translation, be notified of email, or receive scoring updates from your favorite teams.
You can view them all at https://addons.mozilla.org/en-US/firefox/.
A recent one that has worked its way into my every day life is Read It Later. It puts a little checkmark icon in the location bar of Firefox (circled in red below), and a "Read It Later" folder in your bookmarks menu. If you run across an interesting article or webpage, you simply click the checkmark icon in the location bar, and it will save the webpage as a bookmark inside the Read It Later folder inside your bookmarks menu. That way, you can look at the pages you've flagged when you find the time.
Read It Later is also available for Internet Explorer, Safari, Chrome, and many cellphones. Learn more about it, and download it, at http://readitlaterlist.com/
Thanks to Loretta Lohman for suggesting the topic of Firefox add-ons.
Labels: browsers
I mentioned in a training last week that a good way to learn about Cascading Style Sheets is simply to type a property and "CSS" into a search engine (e.g. "font size CSS") and follow one of the million returns you get to a tutorial. You learn how to manipulate attributes as you need them.
For more in-depth tutorials, I'm going to recommend four sites.
Listorial (http://css.maxdesign.com.au/listutorial/) is a great resource for learning how to "tame" your lists and get them to do what you want. Lots of step-by-step tutorials on lots of different kinds of lists. I really like this site.
They also have am associated site called Floatorial (http://css.maxdesign.com.au/floatutorial/) that offers a similarly formatted set of tutorials on floating images, columns and text.
The World Wide Web Consortium, or W3C (http://www.w3.org/) can be thought of as the "gatekeepers" of web standards for HTML and CSS. They have tutorials for both HTML and CSS (http://www.w3.org/2002/03/tutorials). This is probably the best resource for learning about specific properties and their attributes in CSS.
A List Apart (http://www.alistapart.com/) offers more advanced articles on web design in general, but if you use their search feature, you'll find many useful resources concerning CSS.
Finally, we have a "Writing HTML and CSS from the Ground Up" course available on-line (http://www.coopext.colostate.edu/comptrain/cohtm.shtml) which consists of five one hour Connect sessions on HTML and CSS basics.
Labels: css, online tools
What is a custom 404 Error page? Have you ever clicked on a link when searching for something on a search engine page (such as Google or Yahoo) and you get a 404 Error, which is not what you had expected? This usually means that the web page that you were trying to access either no longer exists or has moved. Wouldn't it be nice to be able to give your website-user some tools to be able to navigate back into your website in case they were to try to access a page that does not exist? By creating a custom 404 Error page, you can do just that!
Check out a listing of some really interesting and creative 404 error pages that other people have created: http://www.bspcn.com/2007/09/13/collection-of-awesome-404-pages/
Here in Colorado, the County Extension websites are typically hosted centrally on CSU's Yuma server. Each county has an individual account (CWIS) that allows them to have an individual website. To create a custom 404 Error page, you will need to create a simple .htaccess text file and a 404.html file, which will contain your custom error. This process is very quick and easy. First, open up Notepad (or some other similar simple text editing tool). On a Windows PC, Notepad may be found by clicking on Start > All Programs > Accessories > Notepad. Now, create a simple text file that contains the following line of code:
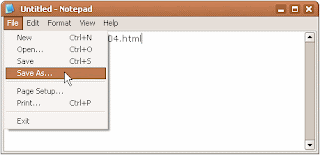
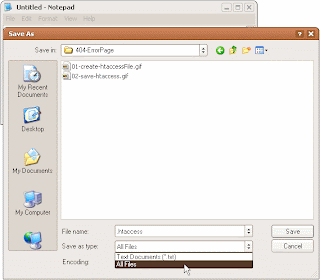
ErrorDocument 404 /404.htmlNext, you are going to want to save the file (File > Save As) on your hard drive, preferably in the root directory of wherever you save your website files. Name the file ".htaccess" (without the quotes). Here's the important part: when you save the file, make sure to selct the drop-down menu for "Save as type" and select "All Files"; otherwise, Windows will add the ".txt" file extension to your file name, which you do NOT want. This file should be called ".htaccess", not ".htaccess.txt", and yes, you do want to have a '.' (period) preceding the file name.


You're now finished with creating the .htaccess file and you can close Notepad. Using Dreamweaver (or your favorite Web authoring tool), create your custom 404.html error page. This page will reside in the root directory of your CWIS account when you are finished, so keep that in mind if you have images or a navigational structure that is coded into your page. It's generally a good idea to state something to the effect of "This page has been moved or it no longer exists" and give the user a method for navigating back into your website; it's also a good idea to include a page title that reads, "404 Error - Page Not Found". To see a live example of a custom 404 error page that resides on the Yuma server, look here: http://ap.colostate.edu/asdfjkl Once you have created the file, save it and name the file "404.html" (without the quotes).
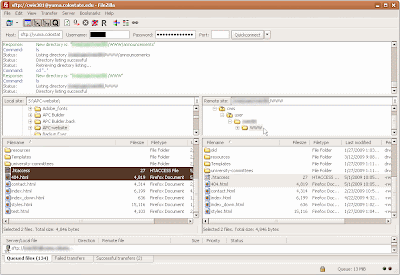
Now you are ready to upload your .htaccess and 404.html pages up to your CWIS account. Both of these files will need to reside in the root directory of your website (WWW folder). Use either Dreamweaver's FTP uploading functionality, or use an FTP client such as Filezilla, as pictured below.
 To test out your new custom 404 Error page, go to your website and type in some gibberish after your URL (www.yourwebsite.com/asdflaksdf); you should see your custom error page.