Adding Captioned Photos to a Webpage

on Thursday, March 14, 2013

You can use a table to place a photo and accompanying caption to a web page.  Start by clicking the Table icon in the Insert panel (screenshot at left).

Use the dialogue box (screenshot below) to create a table consisting of 2 rows, 1 column. Select the table width; the example is set at 50 percent of the containing element. Set border, padding and spacing in pixels.  Click OK.


Click inside the top cell of the table.  Click the Image icon in the Insert panel.  Select the image you'd like to insert, click Okay, and give it Alt text (a succinct description of the image).  Click inside the bottom cell.  Type in your text.  Give it a style from the format box screenshot below); Headings 4, 5 and 6 are generally best suited for captions.  


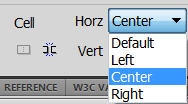
If you'd like to align the content (i.e. - the image or the text) of either individual cell, click inside the cell and use the Horizontal and Vertical cell alignment tools (screenshot at left).
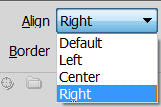


To get the accompanying text on the webpage to wrap around the table you'll need to align the table either left or right. Select the table by clicking the border.  Choose Left or Right on the Table alignment tool (screenshot at left).

Before you publish the page, make sure to preview it in at least two different browsers, as tables appear differently in different browsers.


Dreamweaver Skills Connect Sessions

on Tuesday, January 8, 2013

Have a new copy of Dreamweaver and not sure what to do with it?

For the next four months, I will hold a Connect session on Basic Dreamweaver Skills, on the first Wednesday of every month at 9 a.m.  Each session should take about 40 minutes.  If you are taking over the maintenance of a new web site, these sessions may come in handy.

The schedule:

  • February 6th: Defining the site in Dreamweaver/Using Dreamweaver's FTP
  • March 6th: Adding basic content (text, pictures, bullet points, headers, links)
  • April 3rd: Creating new pages (1, 2 and 3 column formats will be discussed) 
  • May 1st: Working with SSIs (top and left navigation panels, footer) 
Look for emails announcing each session.  If you need more information, please email me at jeffrey.wood@colostate.edu.

Dreamweaver's Page Load Time

on Wednesday, December 19, 2012

A good rule of thumb in web design is to design with dial-up internet access in mind, by keeping your page load time as short as possible.  This can be called the 25 second rule: that your page will load within 25 seconds on a 384kbs (kilobits per second) modem.

Dreamweaver has a page load time indicator in very small characters in the lower right corner of the document panel.  It's easy to miss (see screenshot below).  But it will tell you at any given time what your page load time is.

   
If you want to change the sped of the modem to see how fast your page will load under various conditions, go to the Edit menu, choose Preferences, choose Window Sizes. At the bottom of the dialogue box you will find a pulldown menu to change the speed of the modem (see below).


Password Protecting PDF Documents

on Wednesday, December 5, 2012

It is fairly easy to password protect PDF documents, online or offline. 

Go to the File menu, choose Properties, then go to the Securities tab. Choose Password Security.

Check the Require a Password... checkbox and enter a password.


Click OK, then re-enter the password when prompted.  You'll get a warning that security features won't be enabled until you resave the document.  Click OK to acknowledge the warning, and then OK one last time to close the dialogue box.

Then, resave the document to enable password security (preferably under a different document name so you can tell the two apart).

That's it.  If it's a PDF to be posted online, post it as you would normally.  Anyone trying to open the document,whether online or off, will encounter the dialogue box below.  Once they enter the correct password, they'll be able to access the document. 


Using Custom Find and Replace in Dreamweaver

on Friday, November 16, 2012

Using the Find and Replace command in Dreamweaver, can save you lots of time, particularly if you are adding the same code and/or text in multiple pages, like keywords, or navigation panels.  What makes the command particularly useful is that you can customize the limits of the search.  I use this all the time. It's a real time-saver.

To start, go to the Edit menu, and choose the Find and Replace command.  The dialogue box below will appear.


The Find text box and the Replace text box are pretty self-explanatory. Where this really becomes useful is in using the Find In and Search pulldown menus at the upper left.


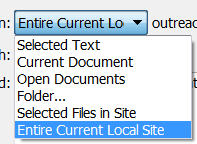
The Find In menu (see screenshot at left) allows you to find/replace in just one page, a selected set of pages, a selected folder, or an entire site.


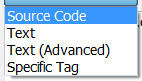
The Search menu (see screenshot at right) allows you to find/replace either in the Text or in the Source Code, but in addition can find/replace inside Specific Tags only, and even, using Text (Advanced), to find/replace text only within specific tags (e.g. - a link, a header, a table).

By using these two pulldown menus wisely, you can save yourself hours of time.   
 

Pixlr Settings

on Thursday, October 18, 2012


Pixlr is a free browser-based image editor, where you upload an image, manipulate it online, and the download the result.  Now Pixlr has three settings (shown above):

Pixlr editor (Advanced) is the most useful tool of the three, allowing you to resize images, combine images, add text, use filters, and many other commands.  The look and feel is very similar to Photoshop, so if you want to get comfortable with using Photoshop, Pixlr is not a bad way to start.  And, unlike Photoshop, it's free! 

Pixlr express (Efficient) presents only a handful of the most useful tools: resizing, text, and basic effects. In my humble opinion, the least useful of the three settings.

Pixlr-o-matic (Playful) is, as the name implies the most fun of the three, allowing you to add many cool and interesting effects, quickly and easily.  Three of them are shown below (the original photo is from 4-H).


iPad Tricks and Tips (part 2)

on Thursday, September 20, 2012

Five more cool things you can do with you iPad (the first 5 are linked here):

Selectively prevent automatic sync: If you have lots of music in iTunes on your PC, it will overwhelm your iPad memory very quickly.  Hold down Shift-Ctrl (or Command-Option, on a Mac) in iTunes while plugging your iPad in, and iTunes will skip the automatic sync just this once. Alternatively, you can safely interrupt a sync by dragging the unlock slider on your device while the iPad is midsync.

Create custom shortcuts for common phrases: Great for addresses, or commonly used phrases. Make AutoCorrect work for you by teaching iOS to transform shorthand (such as "omw") into common phrases (like "on my way") using iOS 5 shortcuts. Simply navigate to Settings, General, Keyboard, and select Add New Shortcut. Type the phrase you want to shorten in the Phrase field, and then type the shortened version you want to use in the Shortcut field.

Restrict mature content: Go to Settings, General, Restrictions and tap Enable Restrictions to selectively apply controls on your apps, content, Game Center, and more. You can use this setting to limit mature content on your new iPad by disabling explicit-language recognition, blocking podcasts that have the "Explicit" tag, or blocking movies, TV shows, and apps that are rated for mature audiences.

Sync your bookmarks: This is my favorite.  You can use iTunes to sync your iPad's Safari bookmarks with your PC's Web browser. Open the iPad tab in iTunes, click the Info tab, scroll down to the Other heading, check Sync bookmarks with, and choose your preferred browser.

Download the free iPad User's Guide: iPad doesn't come with a printed manual. However, you can download the PDF version of the iPad User's Guide from Apple's Web site, or you can read it in iBooks if you have that installed (iBooks is available as a free download in the App Store).