Dreamweaver's Page Load Time

on Wednesday, December 19, 2012

A good rule of thumb in web design is to design with dial-up internet access in mind, by keeping your page load time as short as possible.  This can be called the 25 second rule: that your page will load within 25 seconds on a 384kbs (kilobits per second) modem.

Dreamweaver has a page load time indicator in very small characters in the lower right corner of the document panel.  It's easy to miss (see screenshot below).  But it will tell you at any given time what your page load time is.

   
If you want to change the sped of the modem to see how fast your page will load under various conditions, go to the Edit menu, choose Preferences, choose Window Sizes. At the bottom of the dialogue box you will find a pulldown menu to change the speed of the modem (see below).


Password Protecting PDF Documents

on Wednesday, December 5, 2012

It is fairly easy to password protect PDF documents, online or offline. 

Go to the File menu, choose Properties, then go to the Securities tab. Choose Password Security.

Check the Require a Password... checkbox and enter a password.


Click OK, then re-enter the password when prompted.  You'll get a warning that security features won't be enabled until you resave the document.  Click OK to acknowledge the warning, and then OK one last time to close the dialogue box.

Then, resave the document to enable password security (preferably under a different document name so you can tell the two apart).

That's it.  If it's a PDF to be posted online, post it as you would normally.  Anyone trying to open the document,whether online or off, will encounter the dialogue box below.  Once they enter the correct password, they'll be able to access the document. 


Using Custom Find and Replace in Dreamweaver

on Friday, November 16, 2012

Using the Find and Replace command in Dreamweaver, can save you lots of time, particularly if you are adding the same code and/or text in multiple pages, like keywords, or navigation panels.  What makes the command particularly useful is that you can customize the limits of the search.  I use this all the time. It's a real time-saver.

To start, go to the Edit menu, and choose the Find and Replace command.  The dialogue box below will appear.


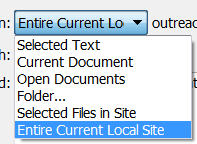
The Find text box and the Replace text box are pretty self-explanatory. Where this really becomes useful is in using the Find In and Search pulldown menus at the upper left.


The Find In menu (see screenshot at left) allows you to find/replace in just one page, a selected set of pages, a selected folder, or an entire site.


The Search menu (see screenshot at right) allows you to find/replace either in the Text or in the Source Code, but in addition can find/replace inside Specific Tags only, and even, using Text (Advanced), to find/replace text only within specific tags (e.g. - a link, a header, a table).

By using these two pulldown menus wisely, you can save yourself hours of time.   
 

Pixlr Settings

on Thursday, October 18, 2012


Pixlr is a free browser-based image editor, where you upload an image, manipulate it online, and the download the result.  Now Pixlr has three settings (shown above):

Pixlr editor (Advanced) is the most useful tool of the three, allowing you to resize images, combine images, add text, use filters, and many other commands.  The look and feel is very similar to Photoshop, so if you want to get comfortable with using Photoshop, Pixlr is not a bad way to start.  And, unlike Photoshop, it's free! 

Pixlr express (Efficient) presents only a handful of the most useful tools: resizing, text, and basic effects. In my humble opinion, the least useful of the three settings.

Pixlr-o-matic (Playful) is, as the name implies the most fun of the three, allowing you to add many cool and interesting effects, quickly and easily.  Three of them are shown below (the original photo is from 4-H).


iPad Tricks and Tips (part 2)

on Thursday, September 20, 2012

Five more cool things you can do with you iPad (the first 5 are linked here):

Selectively prevent automatic sync: If you have lots of music in iTunes on your PC, it will overwhelm your iPad memory very quickly.  Hold down Shift-Ctrl (or Command-Option, on a Mac) in iTunes while plugging your iPad in, and iTunes will skip the automatic sync just this once. Alternatively, you can safely interrupt a sync by dragging the unlock slider on your device while the iPad is midsync.

Create custom shortcuts for common phrases: Great for addresses, or commonly used phrases. Make AutoCorrect work for you by teaching iOS to transform shorthand (such as "omw") into common phrases (like "on my way") using iOS 5 shortcuts. Simply navigate to Settings, General, Keyboard, and select Add New Shortcut. Type the phrase you want to shorten in the Phrase field, and then type the shortened version you want to use in the Shortcut field.

Restrict mature content: Go to Settings, General, Restrictions and tap Enable Restrictions to selectively apply controls on your apps, content, Game Center, and more. You can use this setting to limit mature content on your new iPad by disabling explicit-language recognition, blocking podcasts that have the "Explicit" tag, or blocking movies, TV shows, and apps that are rated for mature audiences.

Sync your bookmarks: This is my favorite.  You can use iTunes to sync your iPad's Safari bookmarks with your PC's Web browser. Open the iPad tab in iTunes, click the Info tab, scroll down to the Other heading, check Sync bookmarks with, and choose your preferred browser.

Download the free iPad User's Guide: iPad doesn't come with a printed manual. However, you can download the PDF version of the iPad User's Guide from Apple's Web site, or you can read it in iBooks if you have that installed (iBooks is available as a free download in the App Store).

IPad Tips and Tricks (part 1)

on Wednesday, September 12, 2012

Five cool things you can do with your IPad:

Screenshots: Take a screenshot of whatever is on the screen: Press Home and the sleep/wake button simultaneously. The screenshot will automatically appear in your Camera Roll.

Multitasking: You likely already know that you can press the Home button twice to bring up a list of currently running apps. However, you can also swipe the multitasking bar to the right to quickly access audio/video playback controls, a shortcut to the iTunes app itself, and volume controls.

URLs: You can check a linked word's actual destination URL by touching and holding down on the link.  It's a smart strategy to help you insure the link is legitimate.

Web Shortcuts: Head to the webpage you want to create the shortcut to, tap the “+” sign at the top of the page and select “Add to Home Screen.” This will then create a shortcut icon offering one-click access to your favorite sites.  

Multiple spaces: I don't know if this is useful, but it sure is cool.  The spacebar will create as many spaces as there are fingers on it, so one finger will produce one space, two fingers two spaces and so on.

Five more cool tricks next week!

Fall 2012 Connect Schedule

on Thursday, August 16, 2012

Happy Fair Season! Below is the schedule for Connect sessions offered by the Tech Unit of CSU Extension. There are two basic threads: on the first Wednesday of every month we'll be exploring Adobe Acrobat and the creation of PDF forms; on the third Wednesday of each month Joanne Littlefield and I will collaborate on a series of sessions about working with graphics, logos and templates.

All sessions will start at 9 a.m. MST, and will last approximately 45 minutes.

• 9/5 – Adobe forms 1: Creating the form
• 9/19 - Brochure templates (w/Joanne Littlefield)
• 10/3 – Adobe forms 2: Distributing the form
• 10/17 - Working with logos (w/Joanne Littlefield)
• 11/7 – Adobe forms 3: Collecting the data
• 11/21 - Newsletter templates (w/Joanne Littlefield)
• 12/5 – PDF security
• 12/19 - Graphics for the web / Pixlr (w/Joanne Littlefield)
• 1/9 – Google docs forms
• 1/16 – Posters (w/Joanne Littlefield)

In addition, the Adobe Acrobat sessions will be offered to our Extension colleagues across the country through eXtension.

Allowing Saved Data on PDF Forms

on Tuesday, August 7, 2012

Anyone who has worked with an on-line PDF form has probably been frustrated by the following words in Adobe Reader: "You cannot save data typed into this form. Please print your completed form."


You can allow end-users to save their data on a form, however, even if they only have access to the free Adobe Reader. All you need to do is enable the Adobe Reader to save the data on your form. After you've completed your form, save it, so you have a copy.

Then, go to the File menu, choose Save As> Reader Extended PDF> Enable Additional Features (see screenshot below).

Now, when the end-user opens up that form, they will get the following message: "You can save data typed into this form."

Editing Transcripts of Your YouTube Video

on Thursday, July 19, 2012

CSU Accessibility requirements state that any YouTube video you publish on-line have an accurate transcript of what is being said. If you worked with a script, that's fairly easy to do; just upload the script as a transcript (more on this at the end of the post).

If you don't have a script, it's a bit more difficult. But the job is made much easier by YouTube's own automatic transcription. It will contain many errors (some unintentionally humorous), but the bulk of the transcription will be done, and all you need do is edit the errors.

After you upload your video, go to the Toolbox above the video and choose Captions on the dropdown on the right-hand side (see the figure below).


Click anywhere in the box just below Machine Transcriptions (see figure below).
You'll see a copy of YouTube's transcript. Click the Download button at the bottom (see figure below).
You'll download a file called captions.sbv. It can be opened in Windows Notepad or the free text editing software TextEdit (available here). Make your corrections. Use >> to indicate a change in who is speaking; use brackets to indicate other aural events (e.g. - [applause]). Ignore the numbers; they are timecodes that tell Youtube when to show the text.
Last step: upload the new transcript. Go back to that Captions tab, and this time click the Add New Captions or Transcript (see figure at right).
Make sure you have Caption file chosen (see figure below), then upload your edited transcript. Delete the machine transcription and you're good to go.

One final note: if you already have a script, you can skip to the last step.  Save the transcript as a .txt file and upload it as a Transcript file (see figure above).

Importing PowerPoint Into Prezi

on Monday, June 25, 2012

Prezi--the excellent non-liner alternative to PowerPoint--has always allowed you to import PowerPoints into your Prezi presentation with the Insert tool, but there is now a dedicated PowerPoint Import tool, making the process that much easier.  At left is a screenshot of the "zebra," Prezi's primary formatting tool.  The new PowerPoint Import tool is highlighted in a blue box (or perhaps purple; I'm color-blind).  At any rate, click it, browse to your PowerPoint, and you've turned your PowerPoint into a Prezi.

Prezi can be found at http://prezi.com/index/.  Most versions are free, and if you apply for an educational license you can get some exciting paid options free as well.


Some excellent tips and tricks for "Prezi-fying" your PowerPoint presention by taking advantage of Prezi's zooming and framing capabilities are below.  I highly recommend you spend 3 minutes watching the video if you are interested in learning more about Prezi.


Saving PowerPoints as Video

on Friday, May 4, 2012

A weird little feature new to the latest version of PowerPoint is that you can save your PowerPoint as a .wmv (Windows Media) video.  Who knew?

The command is somewhat hidden, but if you go to the File menu, choose Save & Send, then Create a Video (a screenshot is at left).  You be given options to choose a screen resolution, choose existing slide timings and narration, set new timings and narration, or give each slide a predetermined amount of time (e.g. 5 seconds).  Click the Create Video button and you're done.  Be aware that long or complex PowerPoints will take some time to render.

If you have a video embedded within your PowerPoint it will automatically play when the presentation gets to that slide.

Below is a very short PowerPoint on Password Protection rendered into a video, with 5 seconds per slide.  

Linking to Specific Spots on a YouTube Video

on Monday, April 23, 2012

Most of you know how to link to a YouTube video. You go to the YouTube page and copy the link in the address bar (or, alternately, click Share below the video and copy the link).

What you may not know (and I didn't know til last week) is that you can easily change the link so a video will start at a certain point in the middle of the video. Just click Share, then Options on a video page. The screenshot at left shows the YouTube dialogue box.

You can also simply add #t= and the number of minutes and seconds at the end of the URL. For example, if you wanted to start at 4 minutes and 7 seconds, add #t=4m7s to the end of the URL and you're done!

 In the example link below, I added #t=0m13s to the end of the URL, which will start the video 13 seconds into it, or right before the rocket launches.

http://www.youtube.com/embed/m6nTibKZLFA#t=0m13s

Thanks to Darrin Goodman for the tip.

YouTube Video Editing

on Thursday, March 29, 2012

Following on the heels of my last post about image stabilization, here is another cool feature of YouTube: you can easily trim the start and end points of any video you upload to YouTube on the fly.

First step: upload the video to YouTube. After it has processed, bring the video up and click Edit. Click Enhancements.


Click Trim.


You'll then get a preview screen, and an area just below it where you can drag the Start and End bars to trim the beginning and end of your video (see below). Play the preview to see your video with the new edits, and fine-tune them until you are happy with the result. Click Done. And that's it. Because the entire video has been uploaded, you can go back and change these edit points, including adding cut portions back into your video, anytime you like.

YouTube Image Stablization

on Monday, March 19, 2012

YouTube has added several new user-friendly editing features to its user interface lately, from automatic transcription to editing. Today's post deals with image stabilization.

You can have YouTube automatically stabilize a shaky video. First step: upload the video to YouTube. After it has processed, bring the video up and click Edit.


Next, choose Enhancements at the top of the page.


Click Stabilize. That's it! Be aware the stabilization process will take some time; in my test it took about 20 minutes.

Flickr Slideshow

on Tuesday, February 28, 2012

Flickr Slideshow, at http://www.flickrslideshow.com/, makes it very easy to create a slideshow from your photoset at Flickr. You give them the URL of your photoset, the width and height of the slideshow, and the site returns the code you need to put the slideshow up at a website or blog (shown below).

The first step is to create a Flickr account. Go to http://www.flickr.com/, register for free, and upload your photos.

Next, go to Flickr Slideshow, at http://www.flickrslideshow.com/. Type in your photoset URL (generally http://www.flickr.com/photos/, followed by a long number specific to your account). Choose the size of your slideshow - the one below is 500 x 400 pixels. Click Create Slideshow, and then copy-and-paste the code the sir returns to you in your blog or webpage.


Created with flickr slideshow.

Editing Video in PowerPoint

on Monday, February 20, 2012

Microsoft Office 2010 has some new video editing tools available that allow you to add fades, automatically go full screen, and make trims and cuts directly in PowerPoint. This lets you avoid the step of having to first edit your video in an outside editor, such as Movie Maker or Adobe Premiere.

To begin, you insert the video the same as you always have: go to the Insert tab, choose Video, then Video from File.

Select your video. You now will have a "contextual" Video Tools tab appear above the other tabs (see image below), and below it two other tabs, Format and Playback. Choose Playback.


To trim video, choose the Trim Video icon. A dialogue box will appear (see image at left). Drag the left marker to set your Start point, and drag the right marker to choose your End point.

To add fades to the beginning and end of your video, use the Fade In and Fade Out boxes just to the right of the Trim Video icon to set the duration of the fades (see image below).

Finally, to allow your video to automatically play Full Screen, check the Play Full Screen checkbox.

Winter-Spring 2012 Connect Sessions

on Thursday, January 12, 2012

Below is the schedule for Web Development Connect sessions in the first half of 2012. Notice the emphasis on two areas: Google tools (Analytics, Docs, Forms, etc.) and slightly more advanced Working With Websites techniques (tables, multimedia, calenders). Those just starting to work with the CSU Extension Webpage Template are highly encouraged to attend these Working With Websites sessions.

Also included is a session on Prezi, a browser-based, non-linear alternative to death by PowerPoint!

2012 Connect Sessions:

Jan 18: Google Analytics
Feb 1: Using tables for web design (Working With Websites 6)
Feb 15: Prezi (an excellent alternative to PowerPoint)
March 7: Embedding Google Calenders on a web page (Working With Websites 7)
March 21: Google Docs
April 4: Multimedia on the web (Working With Websites 8)
April 18: Google Forms

Previous Connect sessions can be found at: http://www.coopext.colostate.edu/comptrain/co.shtml.

Previous Connect sessions relating to Working With Websites and the CSU Extension Webpage Template can be found here: http://www.coopext.colostate.edu/comptrain/co.shtml#wor